Salutations, Junior Professors!
Professor Togglebutton here, welcome to our first class. Today we will be covering how to use an addon called Total Roleplay 3: Extended to create items and share them with your friends, allies, and enemies. You’re probably thinking to yourself, “Professor, you worked on another addon for items, why are you teaching us this one?” Well, my pupils, I may prefer Gryphonheart Items, but TRP3: Extended has more than just items in it. It offers something that could be done in GHI through extensive scripting, but with a much more user friendly input. Let’s get started.
Differences Between Total Roleplay 3: Extended and Gryphonheart Items
Gryphonheart Items (GHI) offers a very flexible and powerful item-creation experience. There are varying user interfaces based on skill level, using a list of effects, connecting nodes, or even pure scripting to create item effects. One of the downsides was that GHI could sometimes be used to harass players. There are safeties built into GHI, however they are not item- or player-specific and often are off by default, a well-intentioned feature to not hinder the experience of new users digging into menus.
Total Roleplay 3: Extended (TRP3: Ex) offers a robust interface for item creation, with fewer options than GHI and relatively no scripting. The workflow system of TR3: Ex operates in a similar manner to the node-based system in GHI, acting as a visual program. However the two are very different on how they handle security. TRP3: Ex uses a per-item permissions system to allow the items to cause you to speak or other effects that could be used to harass players. TRP3: Ex is also an extension on Total Roleplay 3 (TRP3). It requires this addon. TRP3 can conflict with other profile addons. There are ways around this, but to take full advantage of TRP3: Ex you will need to use TRP3 for your profiles. The good thing is TRP3 will import data from other profile addons.
Other differences are apparent in the user interface (UI). GHI uses specialized interface elements for each style of item. TRP3: Ex uses a single style of UI for all creations, from simple items to quest campaigns. The UI for either program can be a bit daunting. For our purposes on this series of articles, we’ll be looking at TRP3: Ex’s tab-based UI. The TRP3: Ex UI uses tabs to cover different aspects in an object (Item, Quest, Cutscene) and Layer Tabs to show what object you are working on. An object can include other embedded objects that each get their own set of tabs to edit from.
That’s all for the differences for now, let’s move on to how to make items. I’ll be walking you through producing a piece of Gnomish Ingenuity.
Creating Basic Items
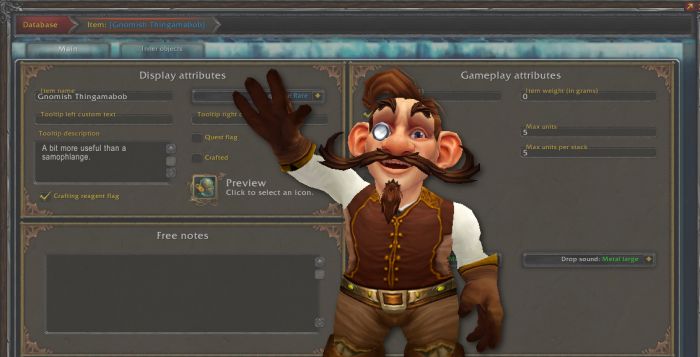
Let’s start by clicking the Extended Objects Database button on the TRP3 toolbar. It looks like a thingamabob. [Fig 1]

From the database window, click the Create Item button at the bottom left. You’ll see a menu like the one below. [Fig 2]

For our purpose, I’m going to choose Blank Item. There are other options, such as Quick Creation that will speed up our process for other items. I wanted to show you the long way so you can see all the options. The menu screen that comes up will look like the one below. [Fig 3]

The screen above has two tabs, Main and Inner Objects. We’ll be using only Main for this tutorial, but will cover the Inner Objects tab in the future. The window has two areas: The upper part that changes with the tabs, and the bottom which is constant while working on an item. At the bottom is a very important button: The Save button is key to remember. If you do not click save, your item WILL NOT SAVE.
For item creation, the Main tab has most of your needs. There are three sections that you can see: Display Attributes, Gameplay Attributes, and Free Notes. Free Notes is there for you to leave notes for yourself or others you share the item with. Consider this to be OOC. Display Attributes are all of the visual aspects of the item in the inventory bag. There are tooltips on the fields for reference on what they’re for. Hover over the icon to preview your item tooltip.
The Gameplay Attributes section adds a number of flags you can set that affect the way the item works in a user’s inventory. Some of them are straightforward, others could use some explaining. I’ll cover the ones that may give you some confusion.
Useable
Useable is a flag that allows you to right click an item to use it. If you check this box, another tab will appear, giving you the chance to create a Workflow for what happens when used. This is beyond this tutorial but we’ll cover it in the future.
Wearable
Wearable is a flag that lets you equip an item in the TRP3 gear system. This is also beyond the scope of this tutorial.
Container
Container is a flag that lets you put other items inside this item, like a bag. There are many more advanced ways this could be used but are also beyond the scope of this tutorial.
Prevent Manual Adding
Prevent Manual Adding flag is very special. If this is checked, you cannot manually add this item to your inventory, nor can a user you trade it with. You would be required to have an item to create this item. This would be useful for a crafted item that is created from another item.

Next time, we’ll make an item with a document. And remember, CLICK THE SAVE BUTTON.
Sample Code
You can import this code into TRP3: Ex just as you can import items in GHI.
^1^T^N1^N1004^N2^S07101540079tsGw^N3^T^SIN^T^t^SBA^T^SDE^SA~`bit~`more~`useful~`than~`a~`samophlange.^SPS^N1190^SIC^SINV_Eng_ClockworkEgg^SCO^B^SNA^SGnomish~`Thingamabob^SST^N5^SQA^N3^SPA^b^SWA^b^SVA^N0^SCR^b^SDS^N1207^SUS^b^SQE^b^SSB^B^SUN^N5^SCT^b^SWE^N0^t^SSC^T^SonUse^T^SST^T^t^t^t^Sdetails^T^t^SMD^T^SCD^S10/07/17~`15:40:07^SCB^SFlipswitch-EarthenRing^SSD^S14/07/17~`09:45:01^SSB^SFlipswitch-EarthenRing^SMO^SNO^StV^N1004^SLO^Sen^SV^N6^t^SCO^T^SOI^b^SMW^N0^SDU^N0^SSC^S4^SSI^S5x4^SSR^S5^t^STY^SIT^SUS^T^SSC^SonUse^t^SsecurityLevel^N3^t^t^^
Comments
No Comments